Build A Fright Show / Getting Started
How to choose the right parts, pick an air source, and build props that actually move — without the guesswork.
How a pneumatic prop system connects together
Pneumatics uses compressed air to push a piston rod in and out of a cylinder. You control the direction with a solenoid valve — an electrically-operated air switch. Open the valve one way, the rod extends; switch it the other way, the rod retracts. That push-pull action is what drives prop movements: a popping skull, a snapping jaw, a lunging torso, a rising arm.
The core system: air source → regulator that drops the pressure to a safe working level and removes moisture → solenoid valve that directs air in or out → the cylinder attached to whatever you're animating.
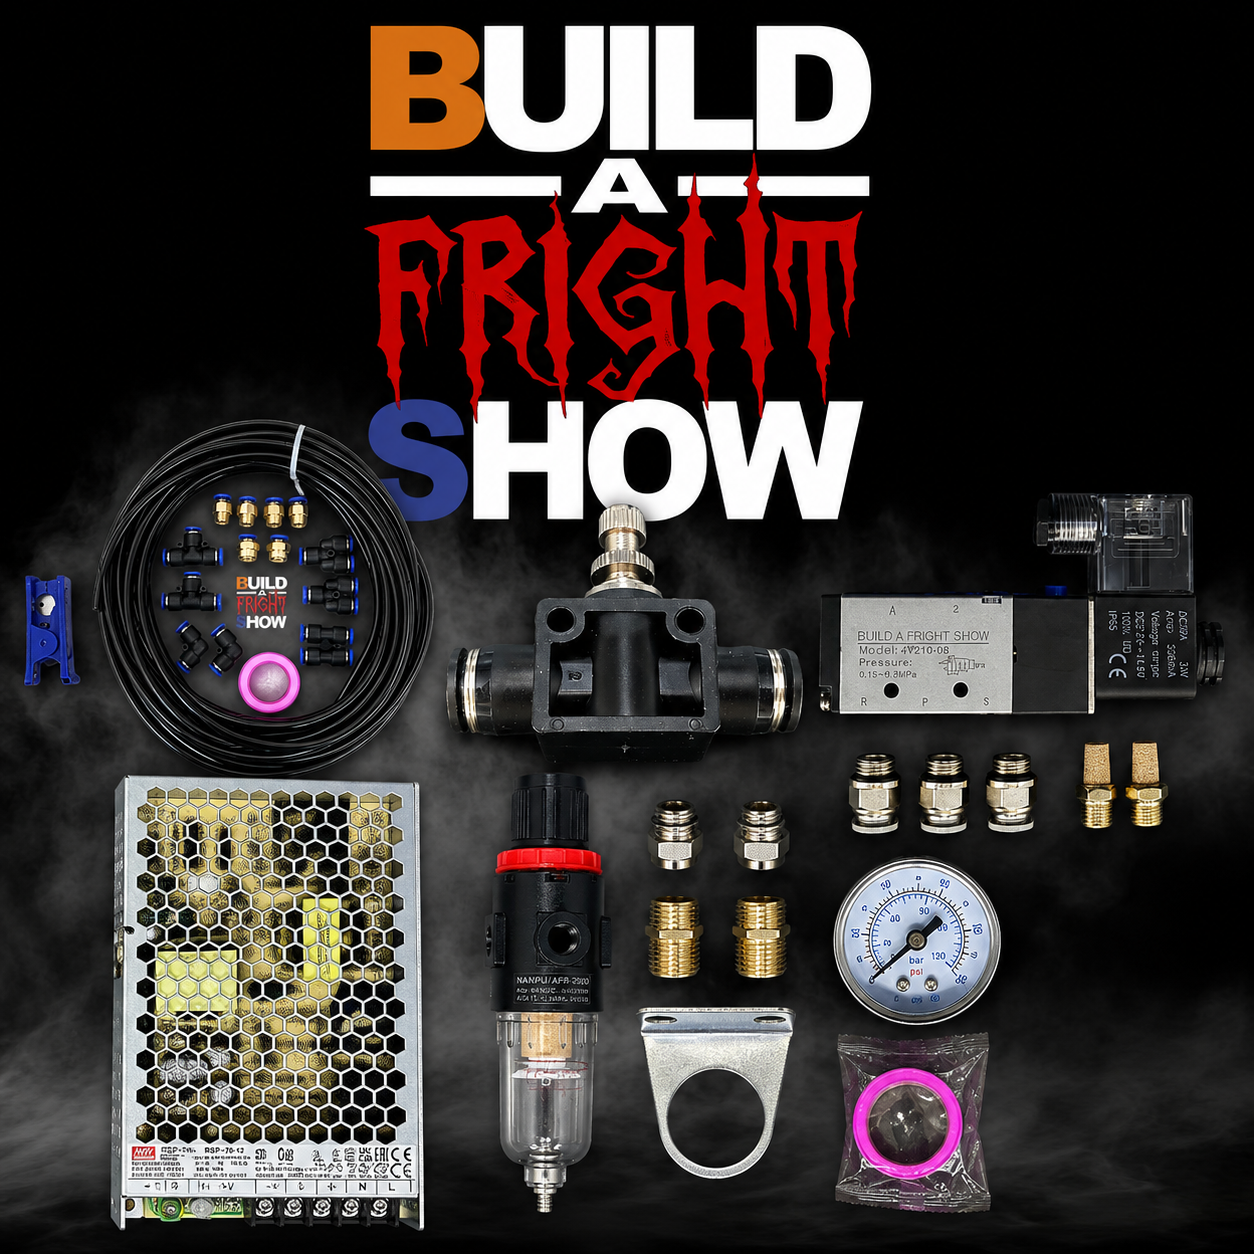
Both Starter Kits include everything except the cylinder and the air source. Specifically:
Not included: the cylinder (choose from our range separately), an air source, and the hose or fittings to connect that air source to the regulator input.
The number refers to the push-fit tubing diameter. Larger tubing flows more air, which matters when you need fast or powerful movements.
6mm kit — for 16mm and 25mm bore cylinders. The most popular choice for Halloween builds. Suits jaws, skull pops, arm raises, head movements, and most mid-sized props.
8mm kit — for 32mm bore cylinders, or when you need faster action or more force. Heavy lunging props, large sweeping movements, hard-hitting jump scares.
The 5-way solenoid valve is the air circuit's switch. When 12V is applied, it directs pressurised air into one end of the cylinder (rod extends). When the power is cut, a spring returns it to the default position and air goes into the other end (rod retracts).
"5-way" means five ports: supply in, two to the cylinder, and two exhaust ports for spent air to escape. Each on/off cycle = one full extend-and-retract of the prop.
Trigger it from any controller that can switch a 12V DC load — relay boards such as the ILightThat BaldrickSwitchy, or a simple push button for testing.
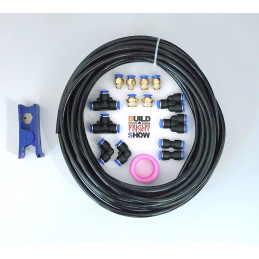
Speed controllers are adjustable in-line restrictors. Without them, cylinders fire at full speed — often fast enough to look mechanical rather than prop-like. Adding a speed controller lets you slow the motion down to something more convincing.
Each kit includes two — one for extend, one for retract — so you can tune how fast the prop lunges and how fast it resets independently. Turn the adjuster screw to open or restrict the flow.
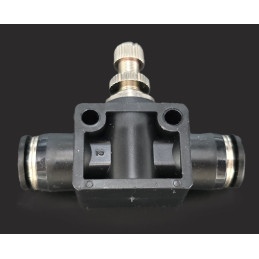
Compressors produce air at high pressure — typically 6–10 bar. Running cylinders at full compressor pressure would be too fast, waste air, and risk seal damage. The regulator lets you dial in a lower, consistent working pressure regardless of what's coming from the supply side.
The water trap catches moisture that condenses in compressor tanks and hoses. Without it, water gets into cylinders and valves over time and causes corrosion and seal damage. Drain the bowl occasionally if you run a compressor regularly.
The included brass fittings and pressure gauge connect directly to the regulator body. You supply the hose that connects your air source to the regulator's input port — see section 04 for details.
The Meanwell RSP-75-12 is a quality enclosed 12V DC switching supply rated at 75W (just over 6A). It powers the solenoid valve and has plenty of headroom to run multiple solenoids if you expand your setup later.
It connects to 230V mains and outputs 12V DC through screw terminals. Meanwell are trusted in the industry and these units run reliably over long display seasons.
The first number is the bore diameter — the internal width of the cylinder in millimetres. This determines force output. Wider bore = more surface area for air to push against = more force. We stock 16mm, 25mm, and 32mm bores.
The second number is the stroke length — how far the rod travels when it extends, in millimetres. A 150mm stroke is roughly 6 inches of movement. Strokes range from 50mm to 500mm across the range.
16mm — lightest, uses the least air, very snappy. Good for fingers, jaws, eye poppers, small head movements, lightweight props under 2–3kg of load.
25mm — the sweet spot for most Halloween builds. Meaningfully more force than 16mm but still air-efficient. Good for skull pops, torso lurches, arm raises, props up to around 5–8kg.
32mm — strong and fast. For heavy props, large sweeping movements, or hard-hitting jump scares. Uses significantly more air per cycle. Needs the 8mm kit.
Choose the shortest stroke that achieves your effect — longer strokes use more air, move more slowly at the same pressure, and take up more room inside your prop structure.
As a rough guide: jaw snap = 50–100mm. Head tilt or skull pop = 100–150mm. Arm raise or torso lurch = 200–300mm. Full body lunge = 300–500mm. Mock up the movement before ordering.
You can use a speed controller and the prop's own mechanical stops to limit actual travel even if the cylinder has a longer stroke than strictly needed.
We sell two mounting types for each bore size (16mm, 25mm, 32mm):
Top Mount — clamps onto the rear of the cylinder body and lets you bolt it flat against a structure. Good for inline push-pull applications where the rod travels in a straight line.
Saddle Mount — wraps around the barrel and allows a small amount of pivot. Essential when the rod end needs to swing in an arc as the prop rotates — which is most builds. Most props need at least one saddle mount to absorb angular movement without stressing the cylinder body.
The one thing not in any of our kits is the compressed air source itself. Three options, from most capable to most budget-friendly.
A dedicated air compressor is the most reliable long-term solution. It runs indefinitely, maintains consistent pressure, and handles multiple cylinders without interruption. For Halloween prop use you don't need anything industrial.
What to look for:
We're finalising a partnership with a trusted compressor supplier — a link will appear here once live. Clarke, SIP, Hyundai, and Draper are all solid brands at UK DIY stores.
Used compressors are plentiful on Facebook Marketplace, eBay, and Gumtree. Tradespeople replace them routinely, so working units appear cheaply and regularly. A genuinely sensible route for a seasonal display.
Before buying, check:
A tried-and-tested trick in the Halloween prop community: use a standard car or van tyre as an air reservoir, inflate it for free at a petrol station, and connect it to your regulator. When pressure drops, top it up or swap in a pre-inflated spare.
How it works: A typical car tyre holds around 10–15 litres and inflates to 35–44 psi (2.5–3 bar). This stores roughly 25–50 litres of free air. Your regulator sits between the tyre and the cylinders and drops the pressure to your working level. As air is used the tyre pressure drops; once it approaches your set-point the regulator can no longer hold output, so you refill.
Practical tips:
See the air consumption table in section 06 for estimates of how many cycles you'll get per tyre at different working pressures.
The kits cover everything from the regulator output onwards. The connection from your air source to the regulator input is something you supply yourself, since it depends on your source type:
| Air Source | Typical Output | What You Need |
|---|---|---|
| Small compressor | 1/4" BSP + quick-release | Air hose with matching coupling; BSP-to-push-fit adaptor for the regulator input |
| Larger compressor | 3/8" or 1/2" BSP | As above with appropriate coupling size |
| Car/van tyre | Schrader valve | Schrader adaptor → 1/4" BSP or 8mm push-fit, then a short hose to the regulator |
| CO₂ cylinder | Varies by bottle | High-pressure regulator on the bottle down to ~3–6 bar, then standard air hose to our regulator |
BSP push-fit adaptors are available from any pneumatics supplier — RS Components, Screwfix, Toolstation. For the tyre method, search "Schrader valve to airline adaptor."
For most Halloween prop applications, 2–4 bar gauge (30–60 psi) is the practical sweet spot. Cylinders move with good authority, seal life is long, and air consumption stays manageable.
Lower pressure (1–2 bar) gives smoother, slower movement — atmospheric and creeping. Higher pressure (4–6 bar) gives snappier action — jump scares and fast pops. Use the speed controllers to fine-tune movement after setting the pressure.
For the tyre method, you're limited by tyre pressure (2.5–3 bar max). Set the regulator at least 0.5 bar below the pressure you're willing to let the tyre drop to before refilling.
Here's how a basic single-prop setup is plumbed — one double-acting cylinder driven by one 5-way valve. Please forgive the sloppy AI diagram below, it uses the actual parts from the Starter Kit until we can do a nice video on this. Everything in tiles is real kit hardware; the air source and cylinder are drawn in because you supply those yourself.
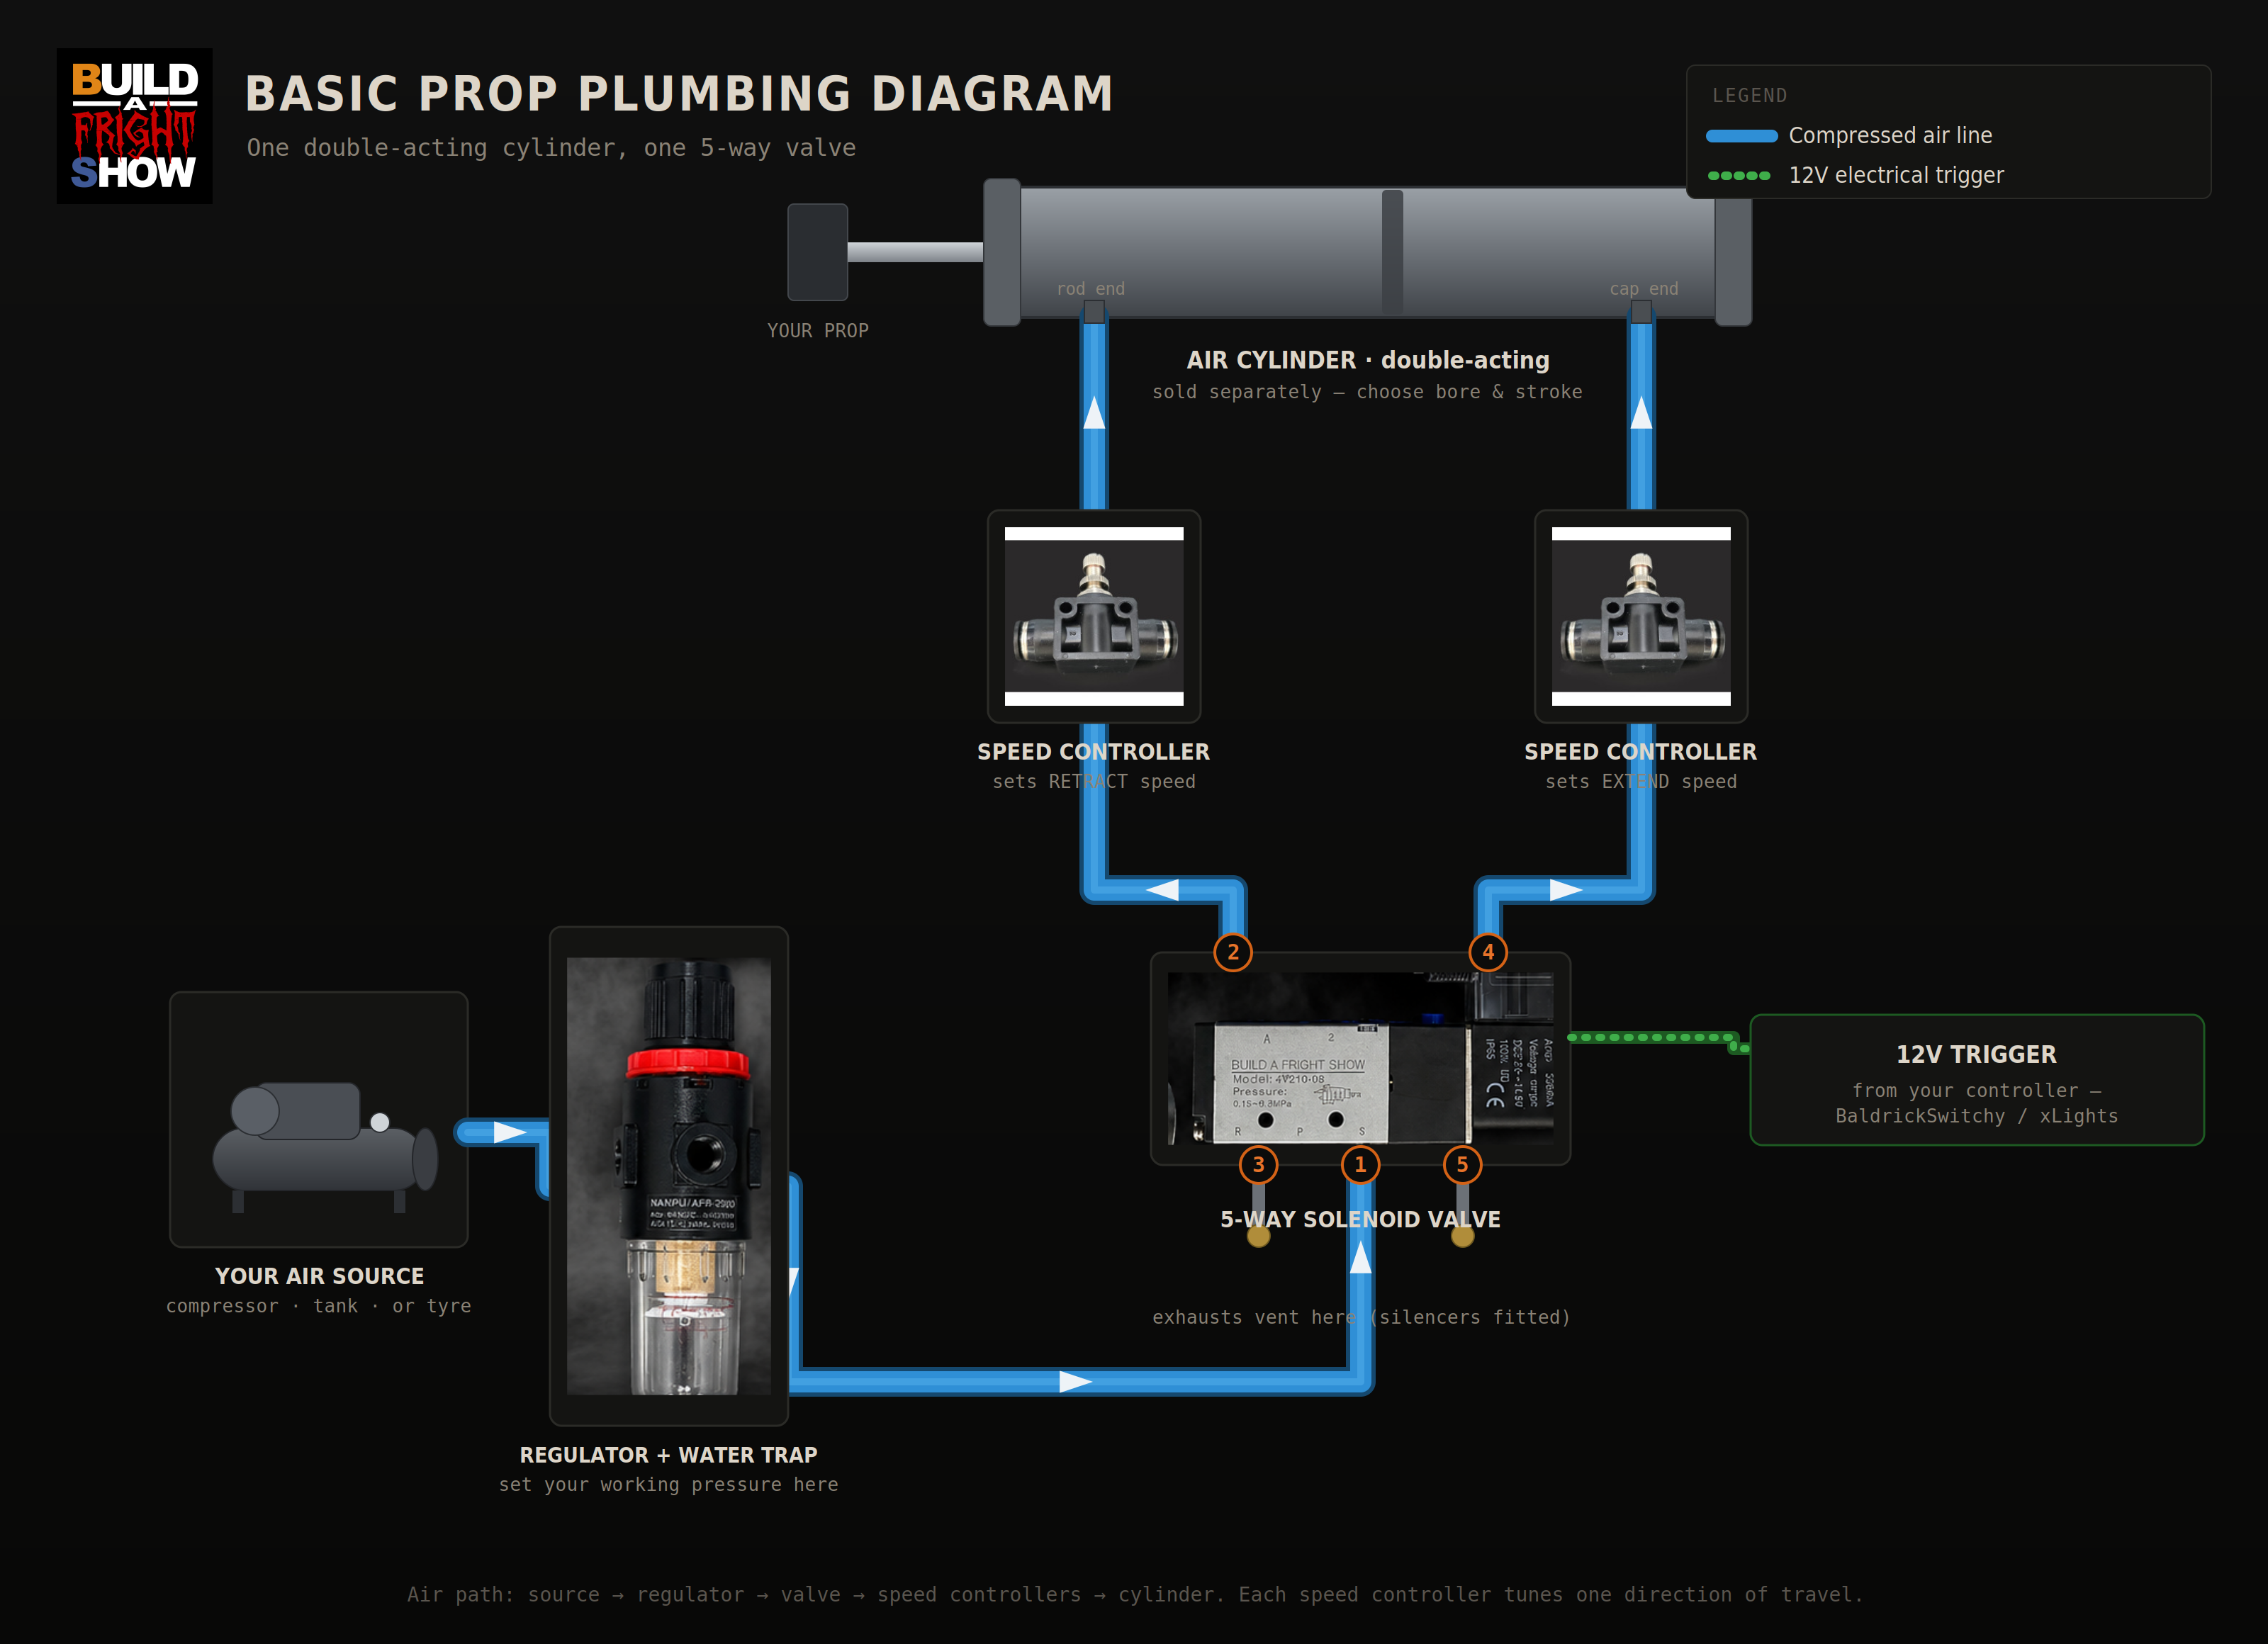
Basic prop plumbing — one cylinder, one valve
Follow the air from the source all the way to the cylinder:
Separately, the green line shows the 12V trigger: a low-voltage signal from your show controller (such as the iLightThat BaldrickSwitchy, or sequenced via xLights) tells the solenoid when to fire. The Meanwell power supply in the kit provides that 12V — see section 08 for more on control and expanding to multiple props.
Litres of free air (at atmospheric pressure) used per complete cycle — one full extend plus one retract. Use this to estimate how long a tyre lasts or what compressor flow you need.
| Cylinder | L / cycle | Cycles (car tyre) | L / min at 1 cycle/min |
|---|
Tyre estimate assumes 12L volume at 3 bar gauge (4 bar abs) = ~48L free air stored; usable above working pressure set-point. Actual results vary with tyre size, temperature, and seal condition.
Add up the air consumed per minute across all your cylinders and compare to what your source can supply.
Tyre sizing: Two 25×150mm cylinders each firing 10 times per minute at 4 bar use roughly 2 × 0.73L × 10 = 14.6 L/min. A car tyre holds ~48L usable at 3 bar, so about 3 minutes of continuous running. Keep a spare pre-inflated tyre for a hot-swap.
Compressor sizing: Most small hobby compressors deliver 100–200 L/min free air. A few 16mm or 25mm cylinders firing a handful of times per minute is well within a compact 6-litre unit. Multiple 32mm cylinders firing rapidly will benefit from a larger tank and higher-flow pump.
Compressed air deserves respect. At Halloween prop working pressures (2–6 bar), it can cause serious injury if fittings fail, are directed at a person, or if a pressurised vessel is damaged. The hobby prop community does this safely every year — the key is following good practice consistently.
Always: use the regulator. Depressurise the system before working on any fittings. Ensure all push-fit connections are fully home — pushed in until the tube can't be pulled out without pressing the release collar. Keep the work area clear during testing and setup.
Yes — and this is one of the most satisfying integrations. The solenoid valve runs on 12V DC and draws under 500mA. Any controller that can switch a 12V DC load can drive it directly — The iLightThat BaldrickSwitchy is perfect, and the upcoming BaldrickScene will be even better.
For sequenced Halloween displays, many builders sync pneumatic props to music via xLights — the cylinder just becomes another channel in the show file.
Yes. Each Starter Kit includes one solenoid valve, which drives one cylinder. For additional cylinders, add more solenoid valves from our range. All solenoids share the same regulator and air supply, connected using the Y-splitters and push-fit fittings we stock.
The Meanwell 12V supply at 75W has headroom to run several solenoids simultaneously. Daisy-chain the 12V across all the valves you're running.
Every additional cylinder adds to your total air consumption. Use the table in section 06 to confirm your air source can handle everything running at once.
Browse the full Pneumatic & Animatronic Parts range →
Always follow safe working practices with compressed air. This guide is for informational purposes — consult a qualified engineer if you are uncertain about any aspect of pressurised system safety. Build A Fright Show is part of Build A Light Show, registered in the UK.